Arduino robots
I’ve been trying to build an Arduino controlled robot. My aim is to build something that can run wirelessly and be controlled from the scratch programming environment.
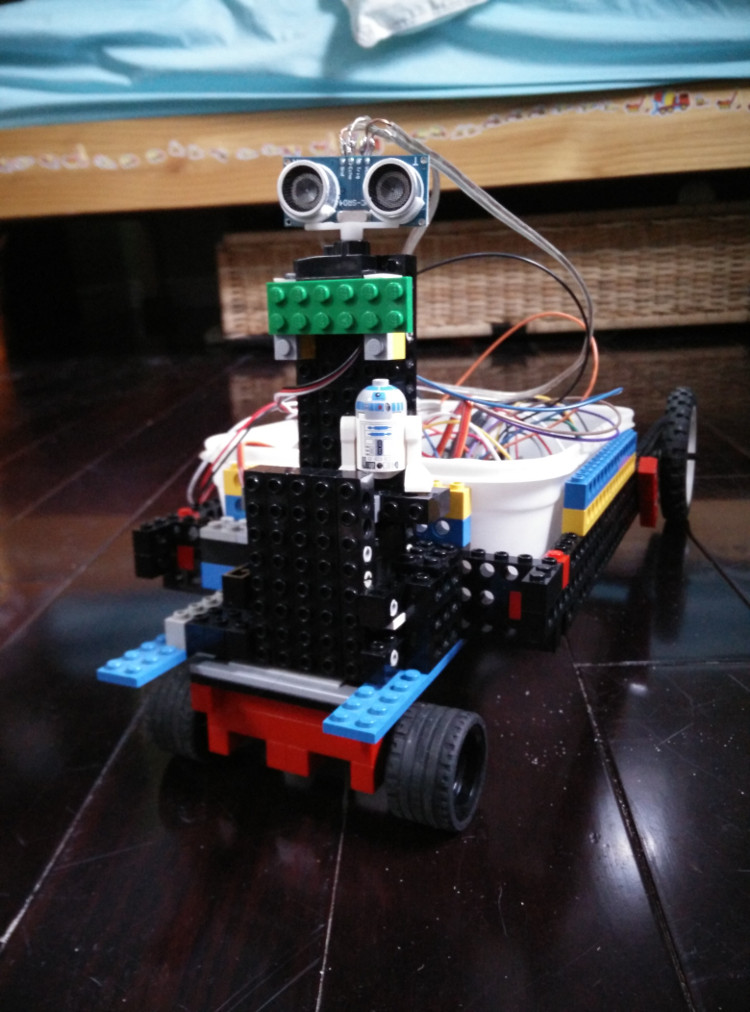
The basic unit was built using lego and tupperware for the chasis, a basic servo for the steering and a distance sensor.

So far so good, it potters around and only occasionally crashes into things. The control code for this robot is in the file [robot_1.ino](https://github.com/tomwright01/arduino-robot. I’m not too happy with the attachment for the steering servo, it’s a bit of a waek point. Sometime soon I plan to redesign this bit.
The next stage of the project was to connect this be able to control the robot using scratch. In case you don’t know, scratch is a great programming language, developed for people to learn programming concepts. Looking at [these] blog posts it looked pretty simple.
It wasn’t
The plan
The plan was to follow the instructions here. Basically an arduino sketch StandardFirmata runs on the arduino enabling control over a serial connection. The serial port of the arduino is connected to bluetooth, then a server application PyMata runs on the host computer interpreting scratch output for the arduino.
Hardware
- Arduino Uno Rev 3
- Lenovo Thnkpad running debian Jessie
- Lego
Enabling the arduino with bluetooth
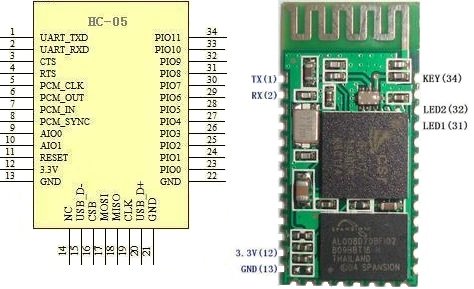
My ardiuno is the UNO rev3, it does not support bluetooth. The HC-05 module is a bluetooth to serial convertor. First we need to configure the HC-05 correctly. The module I bought has 6 pins, nicely labeled: State, RXD, TXD, GND, VCC and Wakeup. On my module, the state and wakeup pins don’t seem to be connected. You need to connect the board
| Arduino | HC-05 |
|---|---|
| Pin 0 | RXD |
| Pin 1 | TXD |
| 3.3V | VCC |
| GND | GND |
To place the module into command mode you need to apply a voltage to Key (34) (see image below) when you power it up. The LED should start to flash once every 2 seconds if you do this correctly.

Connect the ardunio using USB, fire up the IDE and start the serial port monitor. By default the HC-05 should be listening at a 38400 baud. It now accepts AT commands. Type AT and click send, you should get an OK response. Set the baud rate to 57600, required for pyMata, using the command AT+UART=57600,0,0. You can also set the name for the board using AT+NAME=<yourname>. While you’re here you can also checkout the password with AT+PASWD?.
Creating a bluetooth serial connection on the computer
This bit stumped me for several days. I’m still having some permissions problems, binding the port, and connecting to it still needs to be done as root.
The Tx and Rx connections between HC-05 and the arduino need to be reversed
| Arduino | HC-05 |
|---|---|
| Pin 1 | RXD |
| Pin 0 | TXD |
| 3.3V | VCC |
| GND | GND |
-
Find out the mac address for the bluetooth module. $hcitool scan Scanning …
TOM_ROBOT -
Create the file ‘/etc/bluetooth/rfcomm.conf/
rfcomm0 { # Automatically bind the device at startup bind yes; # Bluetooth address of the device device <mac address>; # RFCOMM channel for the connection channel 1; # Description of the connection comment "Arduino"; } -
Bind to the serial port:
sudo rfcomm bind 0 <mac address>This should create the device /dev/rfcomm0To test this connect the Rxd and Txd pins on the HC-05 together and use a terminal to connect
screen /dev/rfcomm0 57600. Anything entered into the terminal should be echo’d straight back. -
Start the pyMata server
sudo python s2a_fm.py /dev/rfcomm0
Connecting scratch
I had problems running scratch on 64bit linux, fortunately there is a replacement Snap!
Well this is as far as I have got. I managed to make the arduino LED flash so that gives me hope I will be able to achieve Total Control.